State and Graph
Axon is a terminal-native coding agent, built from scratch on LangGraph. This chapter puts its skeleton in place: the smallest graph that compiles, wired to a REPL, with a provider switch so the same code runs against OpenAI or a local model.
All the code is in the companion repo, and the blocks below link to the files they came from.
kubilaygulacdi/axonThe repo for the whole series. This chapter builds the first version of it.Four terms carry this chapter, and every later one builds on them:
- State
- The data the agent carries between steps. For now, just the message list.
- Reducer
- The merge rule for one state field. The default is replace; add_messages appends instead.
- Node
- A Python function that takes state and returns the fields it wants to update.
- Edge
- A transition between nodes. START and END are built in.
1. Why a graph?#
A coding agent's loop sounds simple in concept: get input, call the LLM, maybe call a tool, repeat. You could write it as a while True: and we'd be done. So why bring in a graph library?
Two reasons.
Simple control. Once you have tools, the loop has to decide each turn whether to call a tool or finish. With sub-agents, planning, and self-correction, that branching gets richer. A graph makes the control flow explicit and inspectable instead of buried in nested if statements.
Persistence. Agents need to remember conversations, plans, and intermediate state, sometimes across processes (the user closes the terminal and comes back tomorrow). LangGraph treats this as a first-class concept: every state update goes through a checkpointer, when you opt in. We won't use that this chapter, but the design is what makes it cheap to add later.
So we use LangGraph for what it is good at: a state machine with checkpointing, streaming, and control flow built in.
from typing import Annotated, TypedDict
from langchain_core.messages import AnyMessage
from langgraph.graph.message import add_messages

class State(TypedDict):
    messages: Annotated[list[AnyMessage], add_messages]
Right now state has one field: messages. That's the conversation: system, human, assistant, and, once the agent has tools, tool messages.
AnyMessage is LangChain's union of HumanMessage / AIMessage / SystemMessage / ToolMessage. The Annotated[..., add_messages] part is where things get interesting.
2. Reducer#
When a node returns {"messages": [new]}, what should LangGraph do with it?
- Replace the existing list with
[new]? - Append
newto the existing list?
The answer depends on the field's reducer. A reducer is a function that says "given the old value and a new value, what's the merged result?".
add_messages is the reducer LangChain ships for message lists. It does two useful things:
- Appends new messages to the existing list.
- If a new message has the same
idas one already in the list, it overwrites it (handy for streaming partial updates).
Without Annotated[..., add_messages] the default is "replace", so your node's {"messages": [new]} would delete the entire history. With the reducer, your node returns only its delta, and LangGraph merges it in. Here are both cases side by side:
The update overwrote the channel. The history is gone.
The delta was merged in: old + new. Each node returns only what it produced.
This keeps every node's body clean. A node only returns what it produced, not the full updated state.
3. Node#
A node is a Python function. It takes the state, does one piece of work, and returns the fields it wants changed. Input: the state. Output: a dict of updates.
def chat_node(state: State) -> dict:
    return {"messages": [LLM.invoke(state["messages"])]}
Step by step:
- Pull the message list out of state (the conversation so far).
- Call the LLM
LLM.invoke(messages)returns a singleAIMessage. - Return only the new message,
add_messageswill append it.
That's the whole node. It does one thing: produce the next assistant turn.
4. The graph#
from langgraph.graph import START, END, StateGraph

def build_graph():
    builder = StateGraph(State)
    builder.add_node("chat", chat_node)
    builder.add_edge(START, "chat")
    builder.add_edge("chat", END)
    return builder.compile()
What each line does:
StateGraph(State)- declare the schema.add_node("chat", chat_node)- register a node with name"chat".STARTandENDare reserved nodes.STARTis where execution begins;ENDis where it stops.add_edge(a, b)- unconditional transition fromatob.compile()- turn the builder into a runnable graph.
That's it. One node, two edges, the simplest possible agent. Click the node to see the code it runs:
Next we add a tools node and a conditional edge:
when the model wants to call a tool we route to tools and back, otherwise we go to END. Same primitives, more graph.
5. Provider switch: OpenAI or LM Studio#
I want the same agent code to run against OpenAI and a local model in LM Studio. Both expose an OpenAI-compatible API, so this comes down to one if/else:
from langchain_openai import ChatOpenAI
from agent.config import get_config

def get_llm() -> ChatOpenAI:
    cfg = get_config()
    common = dict(model=cfg.llm_model, temperature=cfg.llm_temperature)
    if cfg.llm_provider == "openai":
        return ChatOpenAI(api_key=cfg.openai_api_key, **common)
    return ChatOpenAI(
        base_url=cfg.lmstudio_base_url,
        api_key=cfg.lmstudio_api_key,
        **common,
)Config is a Pydantic BaseSettings: environment variables become typed fields:
from typing import Literal
from pydantic import Field
from pydantic_settings import BaseSettings, SettingsConfigDict

class Config(BaseSettings):
    model_config = SettingsConfigDict(env_file=".env", extra="ignore")

    llm_provider: Literal["openai", "lmstudio"] = Field(default="openai", alias="LLM_PROVIDER")
    llm_model: str = Field(default="gpt-4o-mini", alias="LLM_MODEL")
    llm_temperature: float = Field(default=0.0, ge=0.0, le=2.0, alias="LLM_TEMPERATURE")

    openai_api_key: str | None = Field(default=None, alias="OPENAI_API_KEY")

    lmstudio_base_url: str = Field(default="http://localhost:1234/v1", alias="LMSTUDIO_BASE_URL")
    lmstudio_api_key: str = Field(default="lm-studio", alias="LMSTUDIO_API_KEY")

def get_config() -> Config:
return Config()Switching providers is one env var:
# OpenAI (default)
OPENAI_API_KEY=sk-... agent

# LM Studio
LLM_PROVIDER=lmstudio LLM_MODEL=qwen2.5-coder-7b-instruct agent
LM Studio runs an OpenAI-compatible server on localhost:1234, so the same openai SDK that talks to OpenAI's API talks to it too. No second client, no adapter layer.
6. The REPL#
The CLI just streams updates from the graph and prints them:
from langchain_core.messages import HumanMessage, SystemMessage
from agent.graph import build_graph

SYSTEM_PROMPT = "You are Axon, a terminal-native coding assistant. Be concise."

def main() -> int:
    graph = build_graph()
    print("axon · /exit to exit")

    first_turn = True
    while True:
        text = input("you> ").strip()
        if text == "/exit":
            return 0
        if not text:
            continue

        new_msgs = []
        if first_turn:
            new_msgs.append(SystemMessage(content=SYSTEM_PROMPT))
            first_turn = False
        new_msgs.append(HumanMessage(content=text))

        for event in graph.stream({"messages": new_msgs}, stream_mode="updates"):
            for node, update in event.items():
                render_update(node, update)
Two things worth pointing out:
stream_mode="updates"gives us node-by-node deltas instead of just a final result. That is what makes the REPL feel responsive once tools arrive, because you see each tool call fire mid-loop.- The system prompt is sent only on the first turn. Each REPL turn invokes the graph from scratch (no checkpointer yet), so multi-turn memory isn't here yet. We'll fix that in the Memory chapter; for now the agent answers one self-contained question at a time.
render_update is a small helper that knows how to print AIMessage and ToolMessage instances nicely. We'll come back to it once tool calls actually happen.
7. Run it#
pip install -e ".[dev]"
echo "OPENAI_API_KEY=sk-..." > .env
axon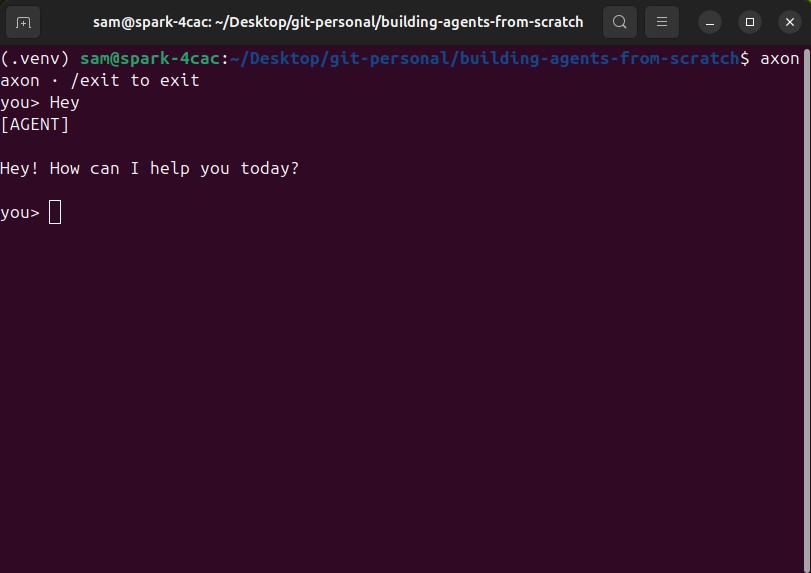
8. Next#
Next the agent stops being a chatbot: tools like read_file and grep, the tool-calling protocol behind bind_tools, and a conditional edge that turns one model call into a loop. By the end, Axon can read your repo, modify files, and search across them.